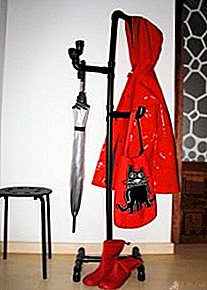
 Polyvinyl chloride is a material characterized by high strength with low weight. It also lends itself well to processing. Thanks to these properties, PVC pipes have found their application not only as communication objects. Some craftsmen figured out how to use them in the production of unique furniture, hangers and other objects of interior and exterior. Homemade hangers made of PVC pipes can be a unique design solution for your hallway.
DIY PVC pipe hanger
In order to create such a hanger does not require expensive tools and a large margin of time. EIf you still have pipes after repair or construction, the price of such an unusual hanger will be generally miserable. And most importantly, this project will not require any special skills - the most difficult thing in it will probably be to saw off an even pipe of the required length.
Materials and Tools
PVC pipe is very easy to cut and process. Therefore, you will not need any expensive tools, and the presence in the shops of various adapters and connectors will allow you to give free rein to imagination. To build a design of any shape and size is not difficult. And if you do not use glue in the work, then after some period of operation it will be possible to disassemble the hanger and make another one, or even use the pipes for their intended purpose.
For a simple floor hanger, which will be interesting and unusual to look in the hallway, you will need quite a bit, namely:
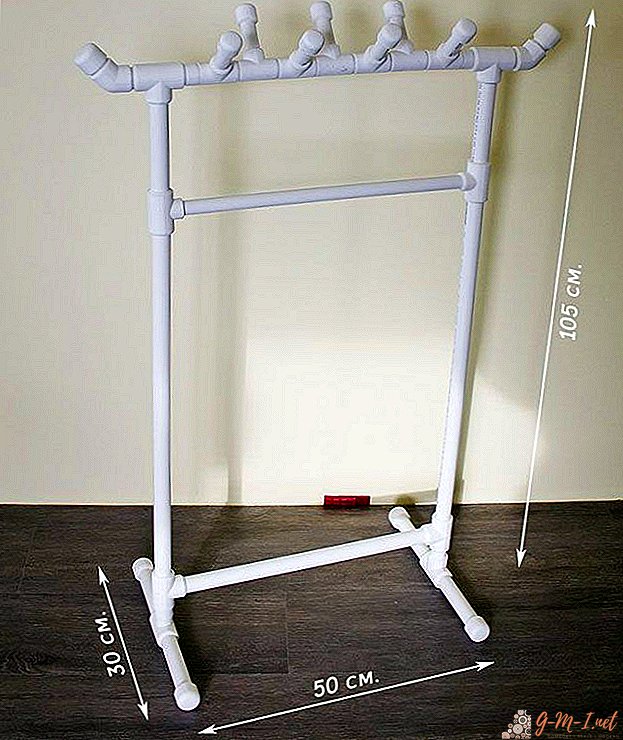
- PVC pipe 250 centimeters. It will serve as the basis for the design. A diameter of 20 to 25 millimeters is best suited for this. Or you can take 2 meters thicker and half a meter thinner, this will make the hanger more elegant. In this case, you will have to take adapters of the corresponding diameters.
- Branches with an angle of 90 degrees - 7 pieces. The diameter must match the selected pipe.
- Six T-shaped connectors. Branches will be mounted on them.
- Seven plugs for PVC pipes. They will close the branches and legs of the structure.
- One cap. Will be used to close the top of the hanger.
- At the request of 4 pieces of felt - on the legs. If there is a chance to scratch the floor.
- Spray can with paint. The color can be chosen at your discretion, the main thing is that it harmoniously blends with the interior.
- Adhesive tape (if you want to make the design collapsible) or glue. Will be used for a stronger connection.
ATTENTION! For the operation of some very expensive tools are not required. If there are special pipe cutters, it’s good, but you can get by with a conventional hacksaw. To smooth the surface in places of cut you will need sandpaper.
The process of manufacturing hangers from polypropylene pipes
Getting to work, first you need to prepare a place convenient for cutting workpieces. The next step will be the marking on the pipe of such segments:
- one 80 cm (future stand);
- one 10 centimeters;
- 2 pieces of 20 cm;
- 3 pieces of 15;
- 6 parts of 12 centimeters each.
Next, you will need to cut it all with a hacksaw or cut with special pipe cutters. After carefully walk through the sandpaper along the edges of the pipes. Remove sharp edges and notches in this way at the cut points.
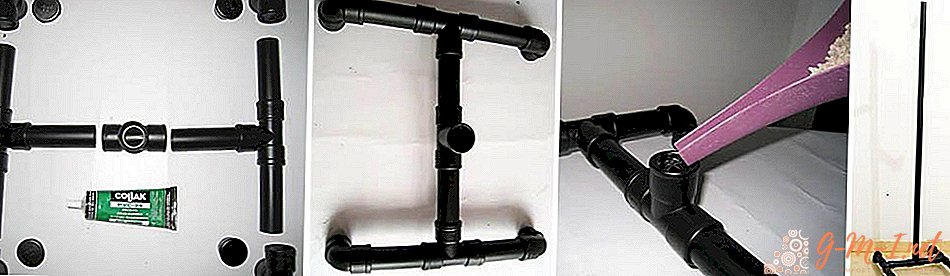
For convenience, you can sort the parts by size. This will speed up the process. When the preparatory phase is completed, all the pieces and glue (or tape) are ready, you can start assembling:
- Two pre-prepared segments of 12 cm are inserted into one T-shaped connector, in its lateral openings. For strength and reliability, the edges of the tubes are lubricated with glue for PVC products or wrapped with tape. 3 such elements are made.
- Further, the resulting segments are connected to each other to get a rack hanger. To do this, two sections are placed in parallel, between them, a third is installed in the holes of the connectors.
- After you need to make the legs of the structure (just put on the four free ends of the corner bends). Install caps on them, with glued pieces of felt (optional).
- Then the legs are turned so that they look down. The central connector aligns and rotates exactly in the opposite direction. The stand is ready.
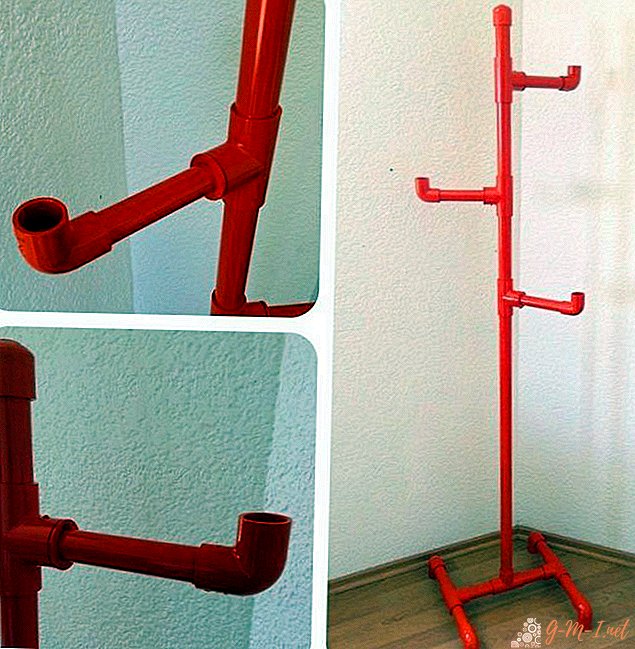
- A length of 80 centimeters must be attached to the previously made part. Now you can do the branches on which clothes will be hung.
- First you need to put on a previously installed pipe T-shaped connector. One of its holes should look up, the other to the side.
- Attach 15 and a centimeter length of PVC pipe to the side hole. To him, in turn, an angular tap with a free hole up, which is closed with a cap. Optionally without a corner. The first branch is ready. After joining in the upper free connector 20-centimeter segment.
- Next, two more of the same elements are done, similar to the previous one.
- Branches are recommended to be deployed in different directions, which will add stability to the structure and make it look like a hanger.
- Continuing the line, a 10-centimeter piece of pipe joins the top. The last final cap is put on it. The hanger is ready.
If stability is not enough, the lower part of the structure should be weighted. To do this, just pour sand into the rack and close it tightly. In conclusion, it remains to paint the entire product with the selected paint and let it dry. The result of the work will be a truly unique hanger, which will surely attract the attention of guests.
Leave Your Comment